How to Set Stop Loss Orders That Protect Your Trades
Learn how to set stop loss orders correctly to minimize losses and lock in profits in 2026. Step-by-step guide for traders.
GeckoScreener Team
Jul 28, 2026 · 14 min read
Updated about 2 months ago
You know the feeling. A trade looks clean, price respects your level, and then one violent wick tags your stop, flushes you out, and runs without you. In crypto, that usually means the stop was placed for convenience, not for the way the market moves.
The fix is rarely mysterious. How to set stop loss comes down to two things, placing the stop where the trade idea is invalid, and matching that stop to the volatility and risk budget of the position. The traders who last in this market do not guess at a round number and hope for the best. They size the position around the stop, then test whether that stop still makes sense when volatility changes.
Table of Contents
- Why Most Stop-Loss Placements Fail in Crypto
- Three Proven Methods for Calculating Stop-Loss Levels
- Sizing Your Position Around the Stop Distance
- Adapting Your Stop When Volatility Shifts Mid-Trade
- Validating Stop Strategies Across Your Portfolio
- Your Stop-Loss Placement Checklist
Why Most Stop-Loss Placements Fail in Crypto
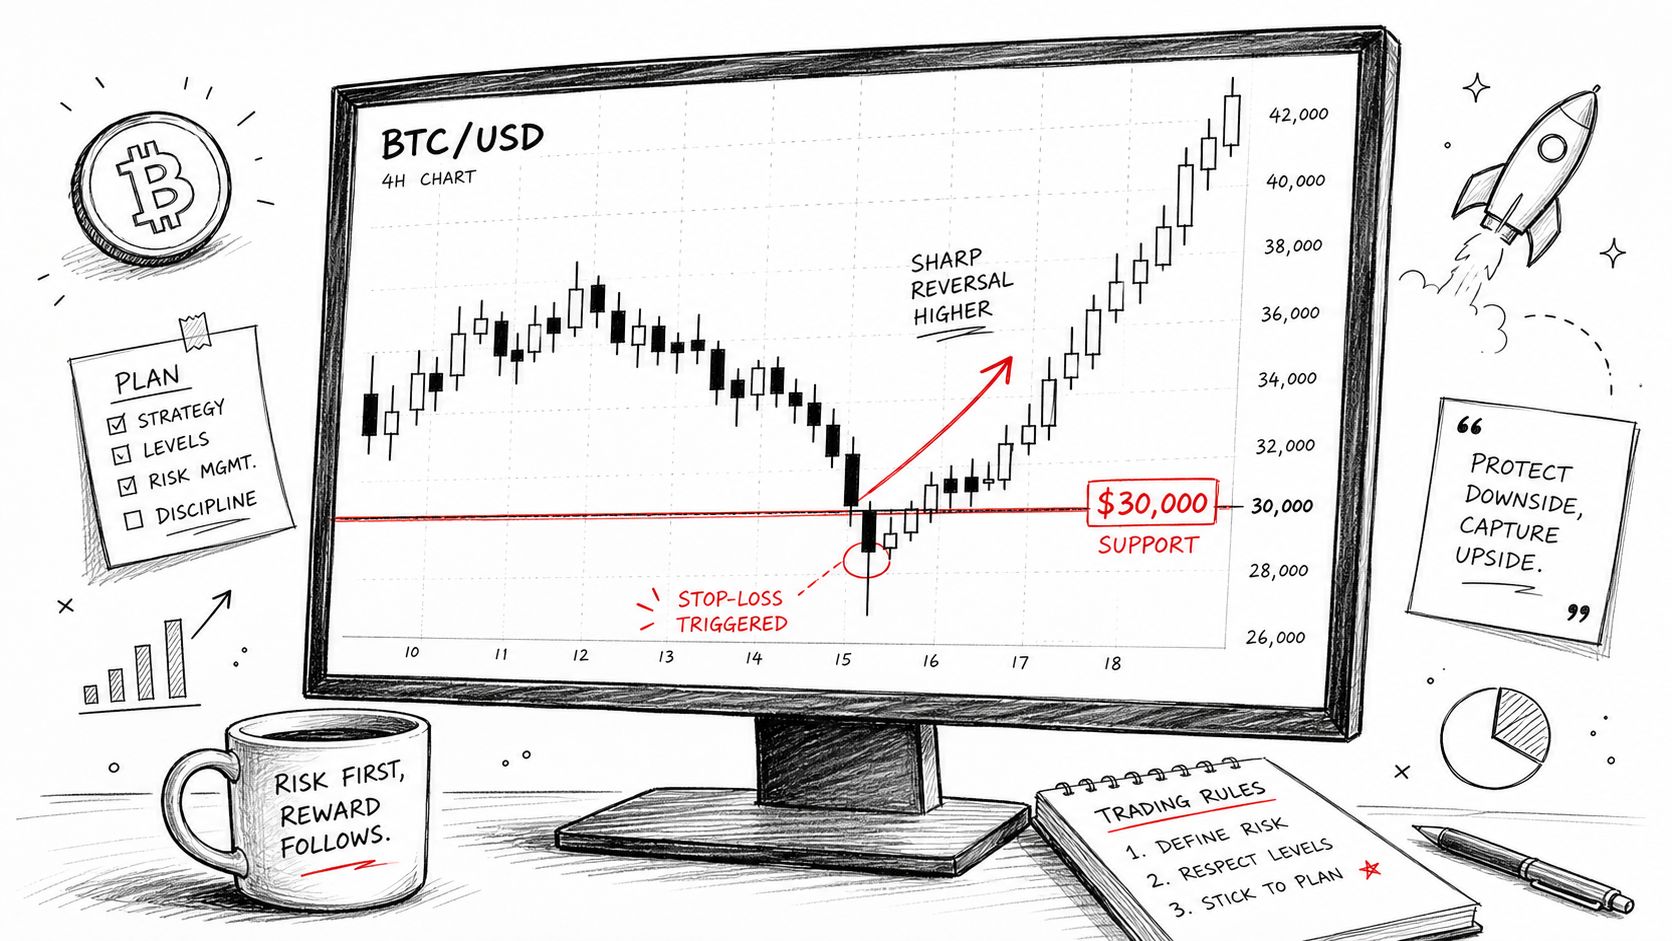
A trader buys Bitcoin near a clean-looking support level, parks a stop just under $30,000, and gets clipped on a fast wick. Ten minutes later, price reclaims the level and trends higher. That trade did not fail because the idea was bad, it failed because the stop sat exactly where everyone else expected it to sit.
Convenience is not a trading edge
Most bad stops are built around convenience. Traders use a neat percentage, a round number, or the obvious swing low because it feels organized, but crypto doesn't care about neatness. The market probes obvious levels, triggers clustered stops, then often resumes the move once that liquidity is gone.
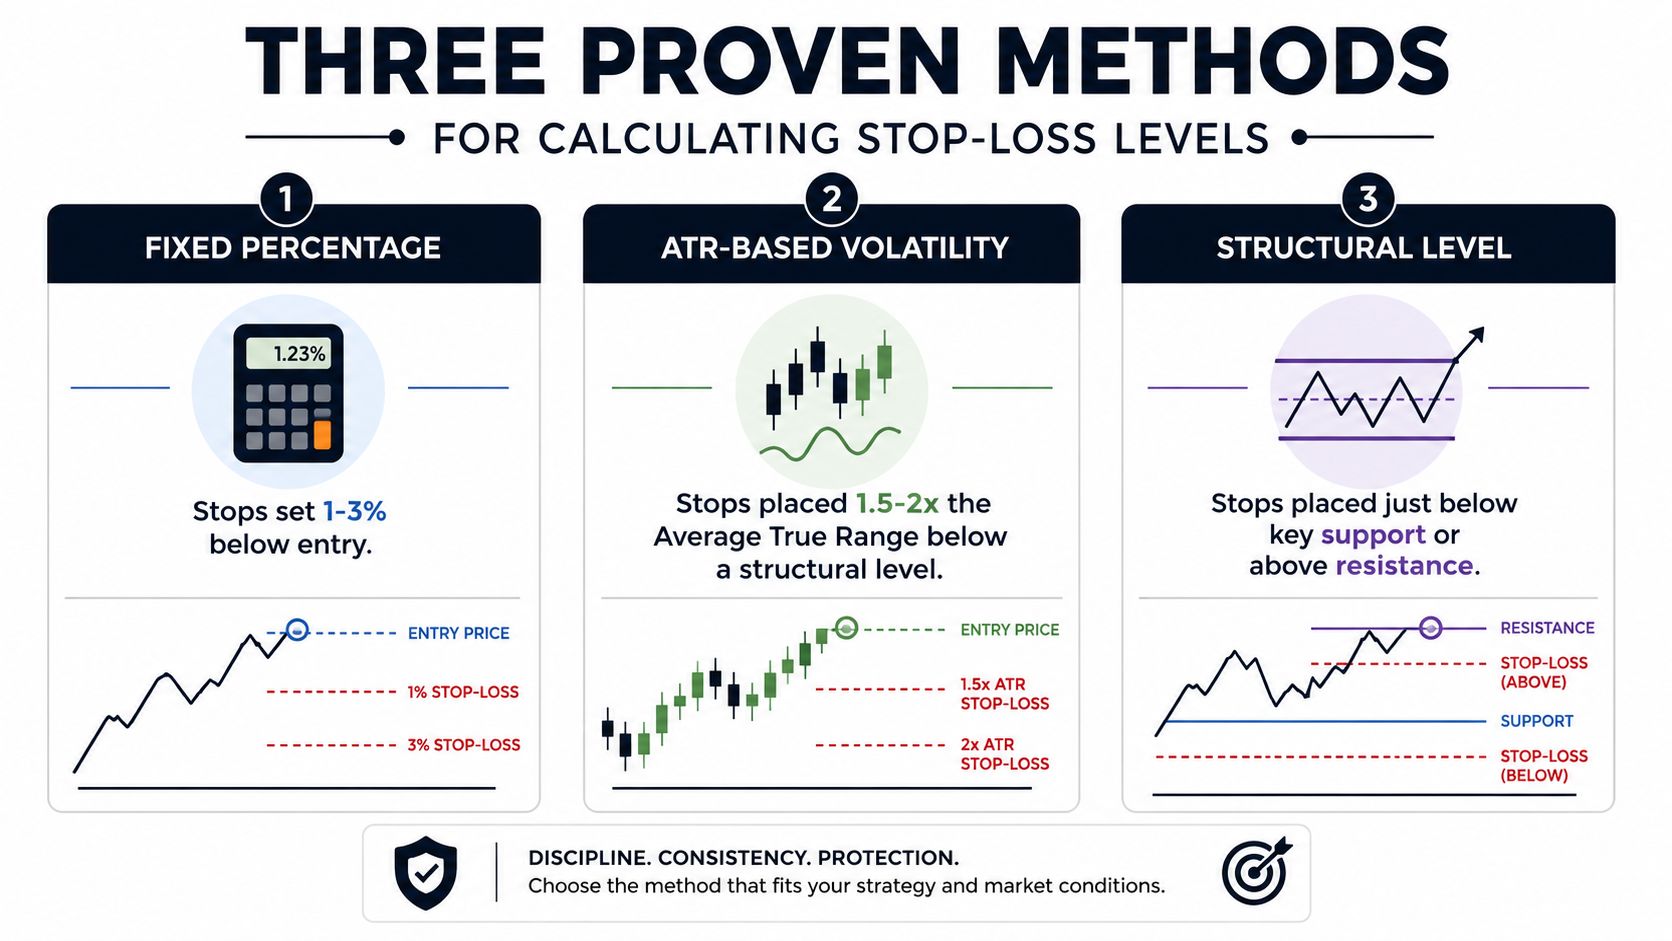
That's why fixed stops tend to underperform in volatile names. A flat percentage doesn't know whether the asset is drifting or swinging hard enough to chew through normal noise. Historical guidance has long recognized this, which is why ATR-based stops are commonly placed about 1.5x to 2x ATR away from entry, with some risk guides extending that to 1.5x to 3x ATR when the asset is more volatile, instead of relying only on arbitrary percentage spacing. The same practical guidance also shows how older percentage rules, such as 1% to 3% for day trading and 5% to 8% for swing trading, are really rough templates, not universal truths. POEMS stop-loss placement guide
Practical rule: If the stop sits exactly where everyone can see it, it's probably too obvious to trust.
Structure beats round numbers
What works better is placing the stop where the trade thesis breaks. That means structural invalidation, not just visual symmetry. If price loses a recent swing low on a long, the long idea is no longer intact. If the stop is placed directly on that level, a routine wick can knock you out before the market reveals whether the breakdown is real.
Crypto traders get punished hardest when they confuse chart cleanliness with risk control. A stop should survive normal noise but fail when the setup fails. That's a different job than marking a line below a candle and hoping the line holds. The difference is why many traders who look disciplined on paper still get chopped up in practice.
Three Proven Methods for Calculating Stop-Loss Levels
A stop only works when it matches how the trade behaves. A scalper, a swing trader, and a breakout trader can all use stop-losses well, but the placement logic changes with the setup, the timeframe, and the coin's volatility. The question is not which method sounds clever. The question is which one fits the trade and still holds up when the market starts moving hard.
Fixed percentage works, but only as a blunt tool
Fixed percentage stops are simple. They are easy to calculate, easy to explain, and easy to apply across a watchlist. Historical guidance often uses rough ranges such as 1% to 3% for day trades, 5% to 8% for swing trades, and 8% to 10% for more conservative positions, which explains why the method became a common first-pass framework. POEMS stop-loss placement guide
The weakness is obvious once you trade enough crypto. A percentage does not adjust to volatility. A 2% stop on one coin may be too tight to survive normal movement, while the same 2% on another may leave too much risk on the table and make the position inefficient. Use percentage stops only when the instrument is predictable enough for the number to mean something.
ATR-based stops adapt to market noise
ATR-based stops work better when the coin's movement changes from day to day. The process is straightforward, measure ATR(14), convert it to price terms, then multiply it by 1.5x to 2x for a standard buffer, or wider when the asset is especially erratic. That buffer keeps the stop outside normal noise without handing the trade unlimited room. technical-analysis-pro stop-loss guidance
Many traders improve immediately when they shift their focus. They stop asking how much pain they can tolerate and start asking how far the asset normally moves before the setup is invalidated. For crypto, that matters more than it does on slower markets, because a tight stop can behave like an easy target for ordinary volatility.
ATR also gives you a better read on whether the market has changed under your feet. If the average range expands after entry, the original stop may no longer reflect real noise. In that case, the decision is not automatic, you either accept a larger stop from the start, reduce size, or stay out of the trade entirely.
Structural stops anchor to trade invalidation
Structural stops are the most defensible choice when the chart has a clear line in the sand. For a long, that is usually just below the most recent swing low. For a short, it is just above the most recent swing high. Guides that focus on stop placement recommend this kind of structure because stops sitting directly on obvious support or resistance are easier to wick through. TraderNest stop-loss guide
That rule matters even more in fast crypto markets, where price can sweep a level, trigger weak stops, and then reverse. A structural stop should sit where the trade thesis fails, not where the chart merely looks tidy. If the setup still has room to breathe, the stop is probably too close. If the stop is so wide that the idea no longer has a clean invalidation point, the setup is weak.
crypto indicator guide can help confirm whether the setup has enough trend or momentum behind it to justify a structural level, since stop placement should match the same market conditions as the rest of the trade.
Best use case: Use structural stops when the chart gives you a clean invalidation point. Use ATR when the coin is noisy. Use fixed percentage only when you need a fast shorthand that keeps risk consistent across a watchlist.
The strongest approach is usually a combination. A structural level defines the trade failure point, and ATR tells you whether that level needs extra room to survive normal movement. Backtests tend to show that this mix holds up better than a single rule used everywhere, especially when you test it across multiple coins instead of one clean example chart.
Sizing Your Position Around the Stop Distance
The professional mistake is not picking the wrong stop. It's sizing the position first and forcing the stop to fit the desired size. That reverses the risk logic. The proper sequence is simple, decide where the trade fails, measure the stop distance, then size the position so the dollar loss stays inside the account risk budget.
Stop distance should define size
A useful rule is position size = account risk / stop distance. If the stop needs more room, the position gets smaller. If the stop is tighter, the position can be larger, provided the setup still makes sense. That's why a wide structural stop on BTC/USDT often requires a smaller size than a tighter stop on ETH/USDT, even when the entry looks equally attractive.
Modern risk management often ties that budget to 1% to 2% of total account equity per trade, and the stop is placed when the position is opened, not after the trade starts to work. StockAlarm stop-loss risk management guide
| Position Sizing Examples by Stop Distance | ||
|---|---|---|
| Stop Distance | Position Size (USDT) | Effective Leverage |
| Tighter stop | Larger size within the same risk cap | Higher |
| Wider structural stop | Smaller size within the same risk cap | Lower |
| Volatility-adjusted stop | Size reduced to keep loss inside budget | Variable |
Wider stops are not a license to overexpose
A wide stop can be correct and still be the wrong trade. If the invalidation point is too far from entry, the risk budget may force the position so small that the reward no longer justifies the effort, or the exposure becomes awkward relative to the rest of the book. In that case, the disciplined answer is to skip the trade or move to a cleaner timeframe rather than pretending the stop can be compressed without consequence. Milton Markets stop-loss guide
That trade-off matters in crypto because correlated assets can all lean on similar structure at the same time. If several positions are effectively betting on the same narrative, the account is less diversified than it looks. A clean stop loses its value if the portfolio is stacked with similar risk.
The math protects the thesis
Once the stop distance is fixed, the position size becomes an output, not a preference. That's the mindset that keeps traders alive during bad streaks. It also creates consistency across BTC, ETH, and smaller caps, because the same risk framework can survive different volatility profiles without improvising on every chart.
Adapting Your Stop When Volatility Shifts Mid-Trade
A stop set at entry isn't automatically valid an hour later. That's the part most guides leave out. In crypto, volatility can expand fast after news, funding spikes, or liquidation cascades, and a stop that was safely outside noise can become a magnet for routine movement.
When the regime changes, the stop changes too
ATR is useful because it moves with the market. If ATR expands materially after entry, the original stop distance may no longer reflect normal price behavior. A trader then has three real choices, widen the stop, tighten it if the structure has improved, or exit and re-enter under the new conditions.
The wrong move is freezing the stop because it felt correct at the open.
Widening makes sense only if the trade thesis still holds and the new volatility regime is temporary enough to justify extra room. Tightening makes sense when price has already moved in your favor and the structure has improved. Exiting and re-entering is often the cleanest choice when the market has changed so much that the original setup no longer exists in the same form.
Decide from structure, not emotion
The practical question is not whether volatility increased. It's whether the increased volatility has changed the invalidation point. If the answer is yes, the stop should be recalculated or the position should be closed. If the answer is no, then a volatility buffer may be enough.
The gap traders miss is management after entry. Most content explains the initial stop placement and stops there. That leaves traders guessing when a stop that looked reasonable on the entry candle becomes meaningless three hours later. In fast crypto sessions, that gap is expensive.
A chart example matters here because volatility expansion is easy to see in hindsight but harder to act on live. The right response is rarely “do nothing.” It's usually a measured decision based on the new ATR, the nearby structure, and the remaining room between entry and invalidation.
Validating Stop Strategies Across Your Portfolio
A stop can work on one chart and fail across a book. That's the difference between trade-level thinking and portfolio-level risk control. In crypto, correlated names can all respect the same support zone and then all fail together, which turns a tidy per-trade rule into a larger drawdown than expected.
Single-chart logic isn't enough
Backtesting should answer two different questions. First, does the stop make sense on the individual coin? Second, does the same stop logic remain stable across a basket of coins and timeframes? If a stop works beautifully on one asset but fails across the portfolio, the strategy is too narrow.
That's why portfolio-mode review matters. You want to see equity curves and trade logs, not just a few winning examples. Clean-looking stops that cluster too tightly across many assets can give the illusion of discipline while still creating concentrated risk.
Compare coins, not just candles
A useful test is to compare how a stop behaves across several assets that share market structure but not identical volatility. Some coins will tolerate structural stops cleanly. Others will need ATR buffers. If the same rule breaks across the set, the problem isn't the backtest, it's the assumption that one stop template fits every market.
For a workflow built around multi-asset screening and comparison, the best free crypto screener overview is relevant because stop validation starts with finding comparable setups, not just pretty charts.
What to look for in the backtest
Focus on the behavior of the stop, not the story around it. If losses cluster around obvious round numbers, that usually means the stop is too visible. If the stop survives normal noise but gets hit only when the setup fails, that's the behavior you want. If the portfolio drawdown worsens when several correlated coins line up with the same stop logic, reduce exposure or change the rule.
Your Stop-Loss Placement Checklist
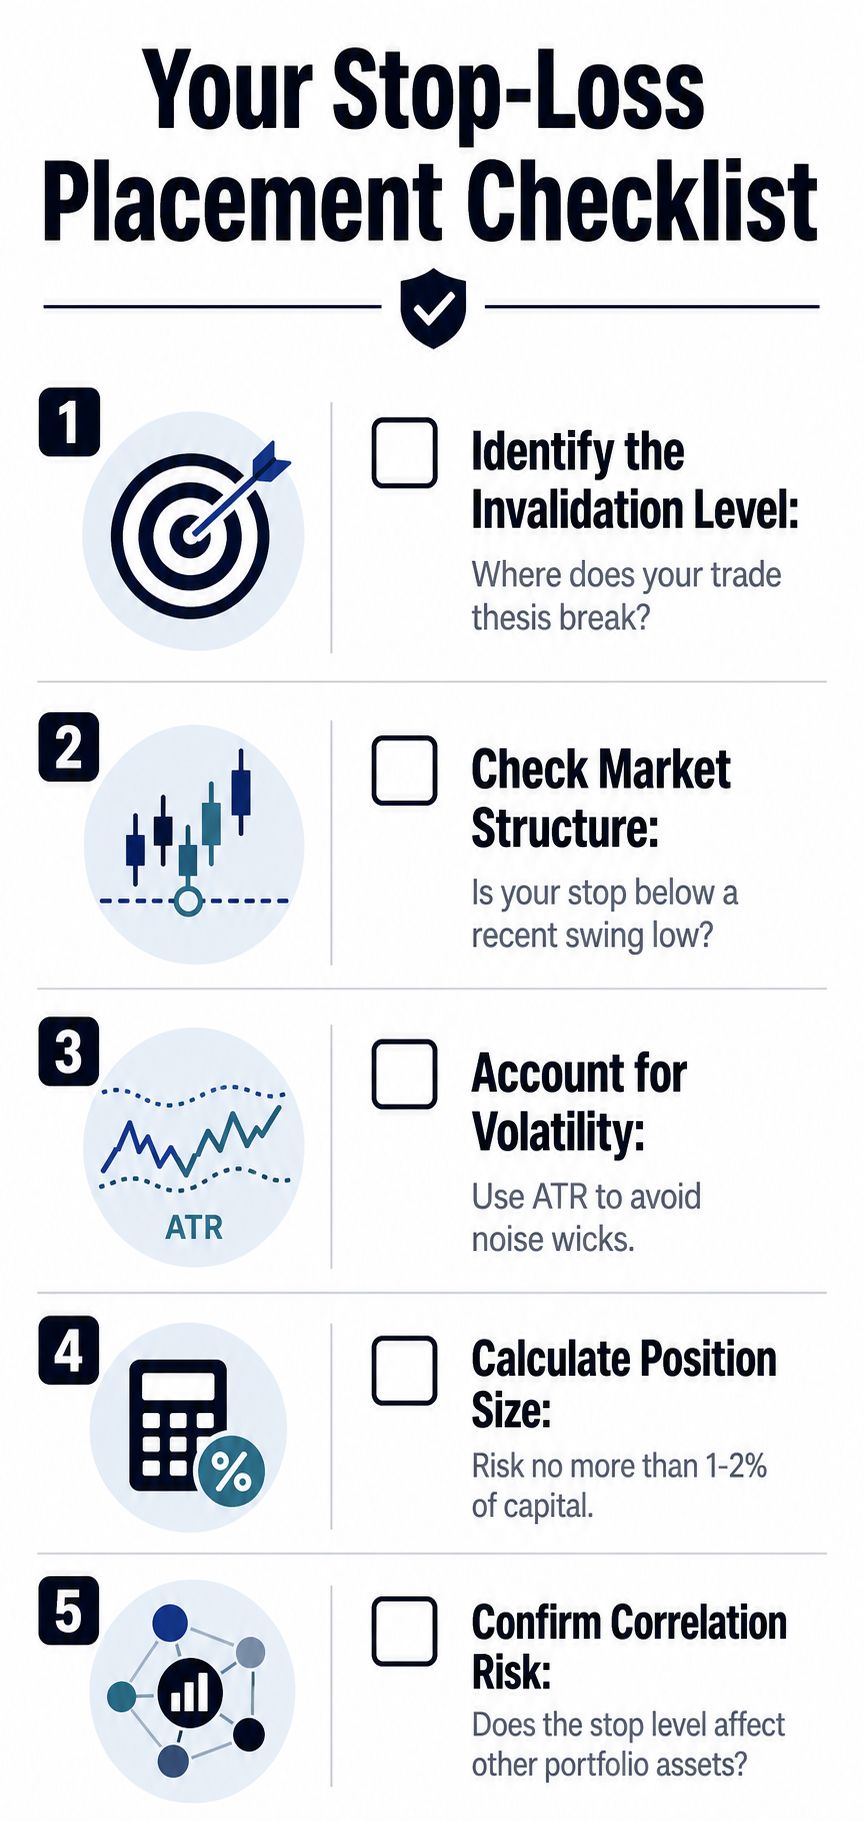
A stop usually goes wrong for one of two reasons. The level is too obvious, or the market changes after entry and the stop never gets adjusted to match the new volatility. Before every trade, run the same checklist in the same order, so the decision is based on structure and risk, not on hope.
Keep the rules tight
- Identify the invalidation level first: If price reaches the point that breaks the trade thesis, the position should be closed.
- Check market structure: Put the stop beyond a recent swing low for longs or swing high for shorts, not right on the level where liquidity often sits.
- Account for volatility: Use ATR so ordinary noise does not take you out before the move has a chance to work.
- Calculate position size: Let the stop distance set the size, then keep the loss inside your risk cap.
- Confirm correlation risk: Make sure one stop does not create too much exposure across coins that tend to move together.
A trade should be skipped when the stop has to sit so far away that the position becomes too small to matter. The same applies when the stop must sit on an obvious level just to make the numbers fit. That is forced risk management, and it usually shows up later as a string of avoidable losses.
The checklist gets stronger when you test it against the whole book, not just one chart. A stop can look clean on a single setup and still fail across a basket of trades if volatility expands after entry or if several correlated coins hit the same level at once. That is why I also review how these rules behave inside the best crypto trading platforms for testing stop logic, because the platform has to support screening, comparison, and repeatable backtesting, not just order entry.
Use the same checklist every time, then review whether the stop failed because the thesis was wrong, volatility shifted mid-trade, or the placement was lazy. That distinction is what separates clean risk control from expensive guesswork.
GeckoScreener Team
Written for the GeckoScreener community. Join us on Telegram →
Related Articles


Start screening cryptocurrencies for free
Apply strategies like this one in real-time across 250+ coins.
Try GeckoScreener →