What Is Stop Loss and Take Profit: A 2026 Guide
Learn what is stop loss and take profit, how to set them using percent, ATR, and technical levels, and how they shape risk-to-reward in crypto trades.
GeckoScreener Team
Aug 21, 2026 · 16 min read
Updated about 2 months ago
You enter a crypto trade because the setup looks clean. Price moves in your favor, the position turns green, and you start thinking about the profit you'll take. Then a fast wick erases the move while you're watching the chart, your confidence disappears, and you close manually with a result far worse than the plan you had in mind.
That outcome usually starts before the market moves. You entered without deciding where the trade would be wrong and where the trade would be good enough to close. Stop loss and take profit orders solve that planning gap by defining both exits before emotion gets involved.
Table of Contents
- The Two Exits That Save Every Trade
- How Stop Loss and Take Profit Orders Work
- Three Practical Ways to Set the Levels
- Two Worked Examples With Real Numbers
- How These Orders Change Risk and Backtest Results
- Common Mistakes That Break the Strategy
- Pre-Trade Checklist Before You Click Buy
The Two Exits That Save Every Trade
A BTC long can look perfect until it reaches a major resistance zone. Price pushes higher, the position sits around 6% in profit, and the trader waits for an even larger move. Momentum fades. A wick drops through the recent candles. The trader hesitates, watches the unrealized gain disappear, then exits manually near breakeven. In a worse version of the same story, the trader keeps waiting for the bounce and turns a winning trade into a loss.
Nothing unusual happened. The trader had no pre-committed exit plan.
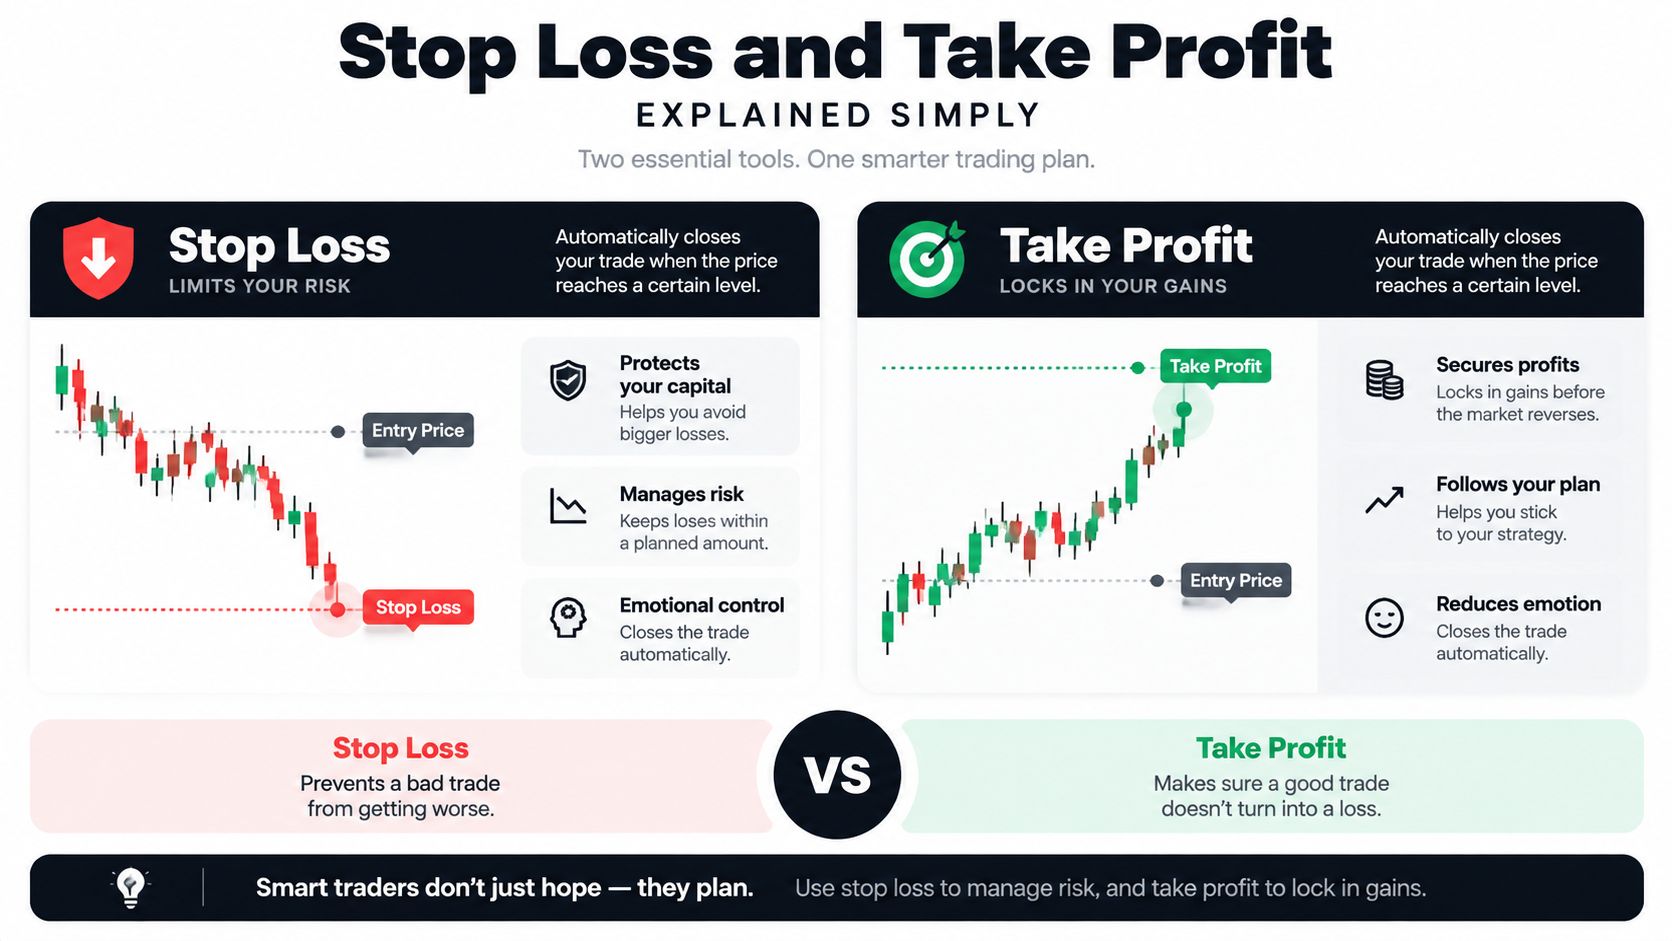
A stop loss and take profit pair turns that open-ended situation into a defined trade. The stop loss closes the position when price reaches the level that proves the setup has failed. The take profit closes it when price reaches the planned objective. Together, they establish the downside and upside before you click Buy.
Practical rule: If you can't state your stop, target, and position size before entering, you don't yet have a complete trade.
The value isn't that these orders predict the market. They don't. A stop loss can be triggered by a temporary wick, and a take profit can close a position just before a larger trend continues. Their purpose is more basic and more important: they prevent you from inventing a new decision while money is already at risk.
The regulatory definition of a stop order matters here. The SEC's explanation of stop orders describes a stop order as an instruction to buy or sell once an asset reaches a specified stop price, after which the order becomes a market order. That means the stop price activates the exit, but it doesn't guarantee the exact fill price. Gaps, thin liquidity, and sudden volatility can create slippage.
The rest of the process is placement quality. You need to choose levels that match market structure or current volatility, size the position around the stop distance, and test whether the exit geometry makes sense across historical trades. The order's presence is only the beginning.
How Stop Loss and Take Profit Orders Work
The order ticket is where a trading plan becomes executable. Before you submit a crypto position, check whether the exchange asks for a trigger price, an order price, or both. That distinction determines what happens after the market reaches your chosen level.
For a stop loss, a trigger can activate a market order, which prioritizes getting out but may fill at a different price during a fast move. A stop-limit order adds a limit price, giving more control over the worst acceptable fill. It can also remain unfilled if price moves past that limit, leaving the position exposed. The setting is not a technical detail to skip. It changes the type of risk you carry after the trigger.
Take profit orders can also use market or limit execution. A limit target specifies the minimum price acceptable for a long exit, or the maximum price acceptable for a short exit. If liquidity is thin, the order may fill only partly or not at all. Review the exchange's labels carefully, especially when the platform offers separate trigger choices for last price, mark price, or index price.
A practical order-ticket check
Open the exchange ticket and verify the position direction first. A long position needs protection below entry and a target above it. A short position reverses those locations. Enter the trigger values, confirm the quantity, and check whether the platform has attached both exits to the same position or placed them as independent orders.
Then inspect the reduce-only setting, if available. It tells the exchange that an exit should reduce or close the existing position rather than open an opposite one. This matters in trading, where an incorrectly configured order can leave a position open or create a new exposure after the first exit fills.
Place a small test order when the interface or order type is unfamiliar. Watch how the platform displays the active trigger, estimated fill, remaining quantity, and cancellation status. Screenshots or a written record make later review easier.
The test begins after the trade closes. Record the intended entry, trigger, target, actual fill, fees, and slippage. Compare the result with the plan rather than judging the trade only by profit or loss. A stop that sits inside ordinary price noise can produce repeated small losses, while a stop with excessive distance can make the position too large for the account's risk limit.
A trailing stop changes its trigger as price moves favorably. Review this practical guide to stop loss and trailing stop loss before adding one to a backtest, because a trailing rule must be defined precisely. Test when it moves, how far it trails, and whether it reacts to wicks or closing prices.
Placement quality appears in the equity curve. Two traders can use the same entry signal and the same exit labels, yet produce different results because one places triggers beyond normal noise and the other uses convenient, obvious prices. The click starts the trade. The recorded fills and tested rules show whether the structure deserves another trade.
Three Practical Ways to Set the Levels
There isn't one correct distance for every coin, timeframe, or market condition. A stop that gives BTC room to move may be far too wide for a quiet market, while a tight stop on a volatile altcoin may sit inside ordinary noise. Start with a method you can describe precisely, then test it without changing the rules halfway through.
Percentage-based placement
The simplest approach uses a fixed percentage from entry. A long trader places the stop a chosen percentage below entry and sets the target at a chosen percentage above it. This method is easy to understand and easy to record, which makes it useful for a first test.
Its weakness is that the market doesn't become equally volatile just because your percentage stays fixed. A fixed stop can be too tight during a fast crypto session and unnecessarily wide during a quiet period. Position size must change if you want the account risk to remain consistent.
Volatility-based placement with ATR
Average True Range, or ATR, estimates recent price movement. An ATR-based stop gives the trade room in proportion to current noise instead of using the same distance everywhere. For example, a rule might place the stop at 1.5 times ATR from the entry, as a starting parameter to test rather than a universal answer.
This approach fits crypto because volatility can expand and contract quickly. The trade-off is that a wider volatility stop requires a smaller position if the account risk budget stays fixed. The target can also use volatility, structure, or a predefined reward multiple.
Structure-based placement
Technical placement begins with the chart, not a percentage. A long trade might place the stop below a recent swing low, outside support, or beyond a relevant Bollinger Band. A target could sit near prior resistance, a Fibonacci extension, or a measured move.
This is often the most meaningful approach because the stop corresponds to the reason for the trade. If the setup depends on support holding, a break below that support should matter. However, structure-based decisions involve more judgment, so two traders may mark different levels. Add a buffer rather than placing the stop exactly on the most obvious line.
| Method | How to Set Stop Loss | How to Set Take Profit | Best Use Case |
|---|---|---|---|
| Percentage | Place it a fixed distance from entry | Use a fixed target distance or multiple | Beginners who need simple, repeatable rules |
| ATR | Place it at a chosen ATR multiple | Use volatility or structure for the target | Markets with changing price noise |
| Technical levels | Place it beyond swing lows, support, or bands | Use resistance, extensions, or measured moves | Traders whose entries depend on chart structure |
A risk-to-reward framework gives the target a consistent relationship to the stop. The risk-to-reward ratio guide explains why a target often gets expressed as a multiple of the amount placed at risk.
Pick one method for the market regime you're trading. Don't use a percentage on one chart, switch to ATR after a loss, then move to structure after another loss. Record the rule, test it, and change it only after reviewing enough comparable trades to understand what changed.
Two Worked Examples With Real Numbers
Numbers make bracket geometry easier to see. The following examples use an entry at 100 and a position size of one unit, so the price distance also equals the dollar risk before fees and slippage. They aren't predictions. They show how different exits create different trade distributions from the same entry.
The conservative bracket
The first trader identifies a nearby swing low at 95 and places the stop at 95. The stop distance is 5 points. A target at 110 creates a 2:1 reward-to-risk relationship, because the potential reward is 10 points against 5 points of risk.
If the stop fills first, the planned loss is about $5 before fees and slippage. If the target fills first, the projected gain is about $10 before fees and slippage. The trader has given the position room below the local structure while keeping the target within a relatively reachable area.
The stretched bracket
The second trader enters at the same 100 and uses the same one-unit position. Instead of placing the stop at 95, this trader chooses 90, just below round-number support. The stop distance becomes 10 points, and a target at 140 creates a 4:1 reward-to-risk relationship, with 40 points of projected reward against 10 points of risk.
A stop-first result is about $10 down, while a target-first result is about $40 up, again before fees and slippage. The wider stop may survive ordinary noise better, but the distant target requires a much larger move and may be reached less often.
| Setup | Entry | Stop Loss | Take Profit | Dollar Risk | Reward Multiple | Typical Outcome |
|---|---|---|---|---|---|---|
| Conservative bracket | 100 | 95 | 110 | About $5 | 2:1 | Smaller loss or nearer target |
| Stretched bracket | 100 | 90 | 140 | About $10 | 4:1 | Wider breathing room, harder target |
The example using an entry at 100, stop at 95, and target at 110 illustrates the same basic relationship, including the effect of fees and slippage on the final result.
If price chops through both levels over time, neither bracket guarantees a clean outcome. Intrabar sequencing, gaps, execution rules, and the platform's trigger source determine what happens. The important difference is emotional pressure. The conservative trader risks less per unit and aims closer, while the stretched trader accepts a larger loss for a more ambitious payoff. Identical entries don't create identical P&L distributions.
How These Orders Change Risk and Backtest Results
Exit rules determine more than where a trade closes. They shape win rate, average win size, and expectancy, the three figures that tell you whether the entry and exit combination has a usable statistical profile.
Expectancy can be written as:
Expectancy = win rate × average win − loss rate × average loss
The values must use the same unit, such as dollars or risk units. A system can win frequently and still lose money if its average loss is much larger than its average win. A system with fewer winners can remain viable when its winners are materially larger than its losers.
The peer-reviewed 2018 comparison of take-profit and stop-loss strategies found that exit-rule choices changed net-profit outcomes across tested parameter sets rather than producing one universal winner. That supports a practical conclusion: TP and SL levels are strategy variables. They need testing by asset, timeframe, volatility condition, and holding period.
Why tighter isn't automatically safer
A tighter stop usually gets hit more easily by ordinary market noise. When it does survive, the trade may have a smaller loss, but the position can also close before the intended move develops. A wider stop may reduce those premature exits, yet it exposes more price distance and usually requires a smaller position.
Targets create the opposite tension. A nearby take profit can produce more frequent wins with smaller average gains. A distant target can produce larger wins, but price may reverse before reaching it. Neither side is superior.
A backtest equity curve shows the combined result. Keep the entries identical and change only the stop and target. The curve can develop different drawdowns, different smoothness, and different losing streaks. One version may reach a higher ending balance but suffer a deeper decline. Another may look smoother while producing smaller gains.
A proper crypto strategy backtest should therefore record every trade, not just the final return. Review the exit price, reason for exit, maximum adverse movement, maximum favorable movement, and whether the target or stop was touched first.
Read the curve, not the fantasy. A parameter that looks impressive on a handful of trades may be fragile when the market regime changes.
Placement quality separates a curve that compounds from one that bleeds. A stop positioned inside routine noise, or a target placed beyond realistic structure, can ruin a sound entry signal. The backtest helps expose that damage before live capital absorbs it.
Common Mistakes That Break the Strategy
Most traders don't destroy a strategy with one dramatic decision. They weaken it through small placement errors repeated across many trades.
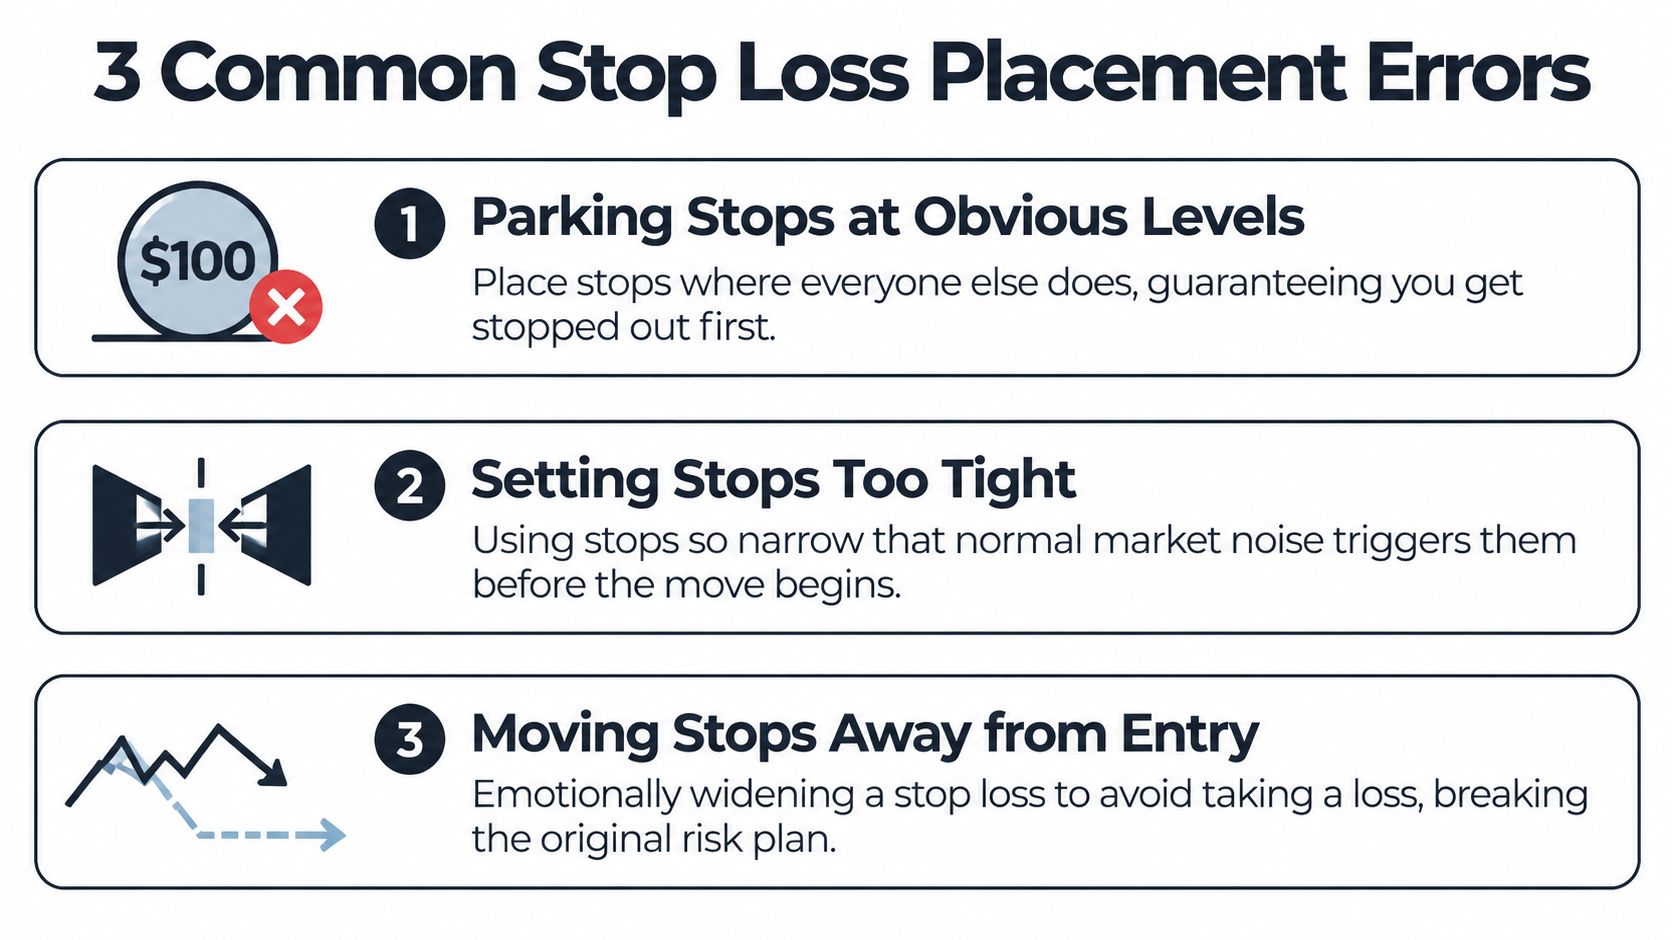
Parking the stop at the obvious level
A previous low, a whole-dollar price, or a clearly visible support line attracts attention. If many traders place stops there, a brief push through that area can trigger exits before price reverses. The practical response is to place the stop beyond the invalidation level with a measured buffer, then reduce position size if the distance becomes larger.
Don't confuse a buffer with permission to widen risk indefinitely. The level still needs to explain why the trade is wrong.
Moving the stop farther away
The trade starts to lose, but the setup still “feels right.” You move the stop farther away and promise to reassess later. That turns a bounded-risk position into an open-ended one.
Choose the stop first and size the position so the original loss is acceptable. If the stop is too painful, the position is too large or the trade doesn't fit the account.
Refusing to take planned profit
A winner reaches its first objective, but you hold everything because the chart might continue. Price reverses, touches the original entry, and the winner becomes a scratch or a loss. A scaling plan can take partial profit at a planned level while a trailing stop manages the remainder.
One market-structure example uses an entry at 85, a stop at 78 below swing-low support, and a target at 98 below resistance. It also describes an alternative trailing stop set 5% below the current high if the trend continues, as shown in this market-structure stop and target example.
The same discipline applies to the take profit. Don't move it farther away because the position is winning. Change an exit only when your written strategy allows that adjustment.
The following video provides another visual explanation of common stop-loss placement errors:
Pre-Trade Checklist Before You Click Buy
Use this sequence before the next entry. Write the answers down, even if the trade looks obvious.
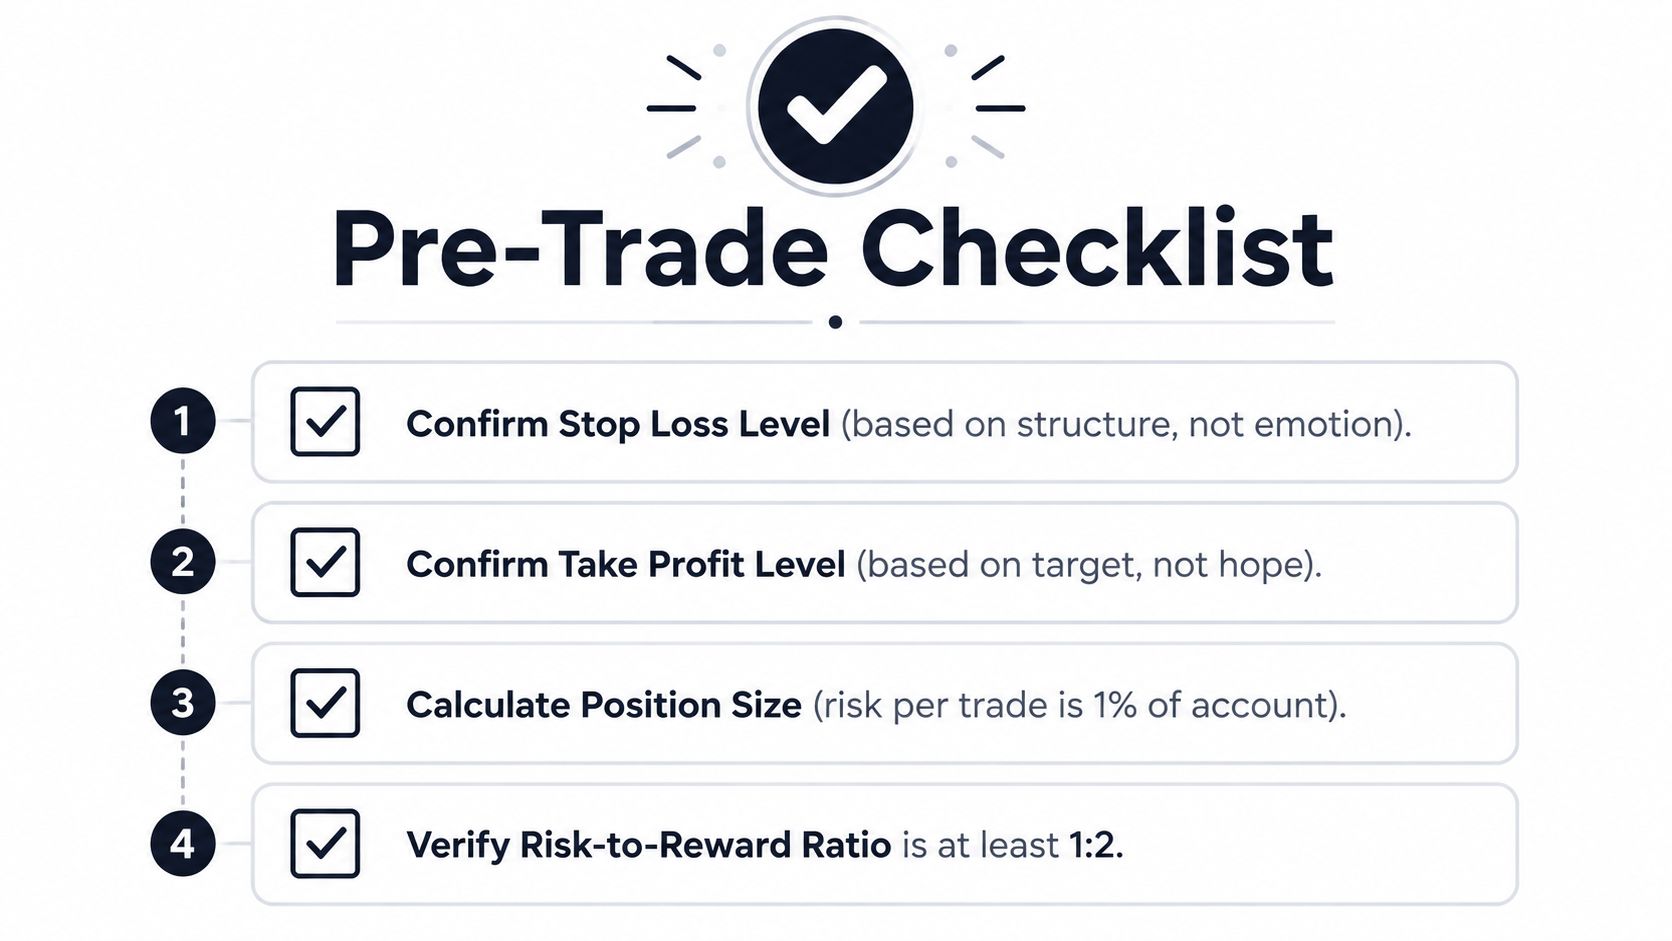
- Mark the invalidation level. State the exact chart event that proves the setup has failed, such as a break below a swing low or a loss of support.
- Set the stop loss first. Choose the level from structure, volatility, or your tested percentage rule. Don't choose it after calculating how much you hope to make.
- Set the take profit. Place the target at a realistic resistance, measured move, Fibonacci level, or tested reward multiple. The target should reflect the trade idea, not wishful thinking.
- Calculate position size. Adjust the number of units so a stop hit risks only the amount allowed by your account plan. A common checklist graphic uses 1% of the account as its risk-per-trade example and asks traders to verify at least a 1:2 risk-to-reward ratio, as shown in the risk-management framework for stops and targets.
- Place and verify both exits. Confirm the stop and target are attached to the correct position, side, quantity, and trigger type.
- Record the plan. Write the entry, stop, target, invalidation reason, and expected reward before clicking Buy.
- Review after closing. Compare the actual exit with the planned exit, then note whether the stop was too tight, the target unrealistic, or the execution affected by volatility.
Alerts at the entry, stop, and target can support the process, but they shouldn't replace attached exits. Decide the exits before the entry. Once the order is live, your job is to follow the tested plan, not negotiate with every candle.
GeckoScreener offers crypto screening, a plain-language strategy builder, and configurable stop-loss and take-profit rules for reviewing historical behavior. Backtesting and alerts aren't available yet, but they're expected to go live very soon, so visit GeckoScreener to explore the current workflow and prepare your exit rules for systematic testing.
GeckoScreener Team
Written for the GeckoScreener community. Join us on Telegram →
Related Articles

Start screening cryptocurrencies for free
Apply strategies like this one in real-time across 250+ coins.
Try GeckoScreener →